Measuring the Efficiency of Diffraction Gratings
While simple in principle, measuring the efficiency of diffraction gratings is a complex process requiring precise methods to achieve acceptable results. Every optical, mechanical, and electronic component comprising an efficiency measuring system is a potential source of error. Environmental factors may also contribute to the overall measurement uncertainty. This Technical Note identifies each source of error, and their effects on efficiency measurements are discussed in detail.
Author
Jeffrey L. Olson - Senior Instrumentation Engineer
Introduction
In his 1982 book Diffraction Gratings, M.C. Hutley makes the following statement regarding the measurement of diffraction grating efficiency:
"One seldom requires a very high degree of photometric accuracy in these measurements as one is usually content to know that a grating is 60% efficient rather than 50% and the distinction between, say, 61% and 60% is of little practical significance."
While this statement may have been true at the time it was written, it is no longer the case today. Certain industries, such as laser tuning and telecommunications, demand gratings with efficiencies approaching theoretical limits. The efficiency specifications for these gratings are well defined, and measurement errors as small as one percent may mean the difference between the acceptance and rejection of a particular grating.
In principle, measuring the efficiency of diffraction gratings is simple. A ratiometric approach is used in which the energy of a diffracted beam is compared to the energy of the incident beam. The incident beam may be either measured directly (absolute measurement) or indirectly (relative measurement, by reflection from a reference mirror). Conversion from relative to absolute efficiency can be made easily by multiplying the known reflection of the reference mirror by the relative efficiency of the grating. (Exceptions to this rule have been noted, namely 1800 to 2400 g/mm gold or copper gratings measured at wavelengths below 600 nm).
A monochromator mode efficiency-measuring instrument, in essence, is a double grating monochromator, with the grating under test serving as the dispersing element in the second monochromator. The first monochromator scans through the spectral range while the test grating rotates in order to keep the diffracted beam incident upon a detector that remains in a fixed position throughout the measurement.
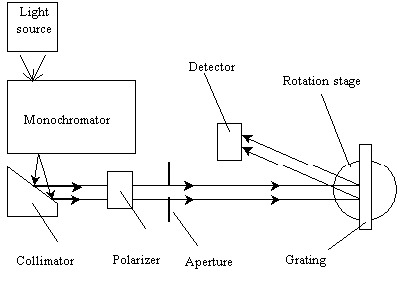
A typical efficiency measuring apparatus (see Figure 1) consists of a monochromator, collimator, polarizer, grating rotation stage, grating mount, detector positioning stage, detector and associated optics, amplifier, and signal processing hardware. Once the beam exits the monochromator it is collimated, polarized, and, if necessary, stopped-down to a diameter appropriate for the grating being tested. The beam is then directed toward the grating to be tested where it is diffracted toward the detector. The electronic signal generated by the detector is amplified, filtered, and presented to the user via any number of devices ranging from a simple analog meter to a computer. In any case, a comparison is made between a reference signal, obtained by direct or indirect measurement of the incident beam, and the signal from the grating being tested.
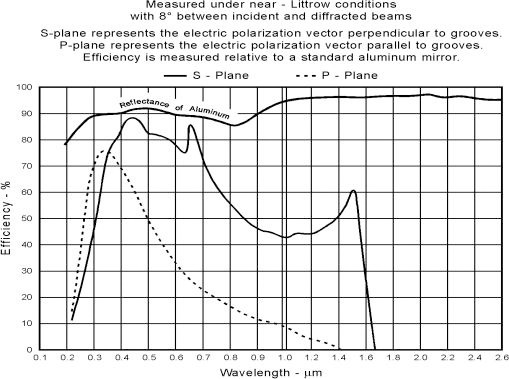
Efficiency measurement results are normally reported on a graph (see Figure 2) with wavelength on the X-axis and percent efficiency (absolute or relative) on the Y-axis. It is very unusual to see a published efficiency curve with error bars or some other indication of the measurement uncertainty. It must be understood that these measurements are not exact, and may be in error by several percent. A complete understanding of the measurement process as well as the sources of error and how to minimize them would be of great value to the technician or engineer making the measurements as well as those involved in making decisions to accept or reject gratings based on efficiency.
Optical Sources of Error
Wavelength Error
Perhaps the most obvious error of an optical nature is an error in wavelength. If the monochromator does not accurately select the desired wavelength, efficiency peaks, anomalies, etc., will appear at the wrong spectral position on the efficiency curve. If the grating being measured is rotated to the appropriate incident angle for a given wavelength, the diffracted beam may partially or totally miss the detector if the wavelength is not correct. This is less of a problem in manually controlled instruments, since the operator can adjust the wavelength or grating rotation angle to obtain a maximum reading. On an automated instrument, however, a significant error may result unless the instrument has the ability to "hunt" for the efficiency peak.
Wavelength errors are usually caused by a failure of the monochromator indexing mechanism to move the grating to the correct rotation angle. Most computer based monochromator systems employ correction factors or calibration tables in firmware to correct systematic wavelength errors. Even so, many monochromators use open-loop stepper motor drives to position the grating. Since there is no explicit feedback from the rotation mechanism, the controller must assume that the grating is in the correct position. If the motor fails to move the proper number of steps due to binding in the mechanical system or for some other reason, the wavelength will be in error.
To ensure wavelength accuracy, periodic wavelength calibration should be done using a calibration lamp or other spectral line source. The author has used the Schumann-Runge O2 absorption lines effectively for monochromator wavelength calibration in the far ultraviolet region near 193 nm. The well-defined Schumann-Runge transitions occurring at 192.6 nm are especially useful spectral features.
Fluctuation of the Light Source Intensity
One of the drawbacks of using a single detector system is that the light source intensity can change between the times the reference and sample measurements are made. With filament lamps, the intensity is proportional to the power dissipated in the filament. According to Ohm's law, power P is the product of current I and voltage E, and voltage is the product of current and resistance R, therefore:
P = IE = I (IR) = I2R (1)
Typically electrical power is applied to the lamp socket, rather than to the lamp directly. The contact resistance between the lamp and socket can be significant and is prone to change over time. If a constant voltage is applied to the socket and the contact resistance was to increase, the current, power, and lamp intensity will decrease as a result. If a constant current is applied instead, no change in power will occur as the result of a change in contact resistance (provided the filament resistance remains constant). For this reason current-regulated, rather than voltage-regulated, power supplies are preferred whenever filament-type lamps are used. A photo-feedback system, in which a detector monitors and controls the lamp intensity, is also a good choice. Regardless of the type of light source used, it is always best that the sample and reference measurements be made in quick succession.
Bandpass
As a rule, the bandpass of the light source should always be narrower than that of the grating under test. The bandpass B of the grating under test is defined by the angular dispersion D of the grating, the distance r from the grating to the detector aperture, and the width w of the detector aperture according to the equation:
B = w/rD (2)
Whenever a grating is measured using a source with a bandpass that is too broad, some of the outlying wavelengths will be diffracted away from the detector. In contrast, when the reference measurement is made using a mirror or by direct measurement of the incident beam, no dispersion occurs. Consequently, the detector captures all wavelengths contained within the incident beam during the reference measurement, but not during the grating measurement (resulting in an artificial decrease in grating efficiency). Another consequence of measuring gratings using a light source with a broad bandpass is that sharp efficiency peaks will appear flattened and broadened, and may be several percent lower than if measured using a spectrally-narrow light source. Efficiency curves should, but often do not, state the bandpass of the source used to make the measurement. When using a monochromator, it is generally best to adjust the slits to obtain the narrowest bandpass that will provide an acceptable signal-to-noise ratio (SNR). Alternatively, a narrow band spectral source, such as a laser or calibration lamp, may be used in conjunction with a monochromator or interference filter to eliminate unwanted wavelengths.
Superposition of Diffracted Orders
According to the grating equation, the first order at wavelength l and the second order at wavelength l/2 will diffract at exactly the same angle. Therefore the light emerging from a monochromator exit slit will contain wavelengths other than those desired. The unwanted orders must be removed in order to accurately determine the efficiency at the desired wavelength. "Order-sorting" filters are most commonly used for this purpose. These are essentially high-pass optical filters that transmit longer wavelengths while blocking the shorter wavelengths.
Another problematic situation arises when the adjacent diffracted orders are very closely spaced. In this case, adjacent orders must be prevented from overlapping at the detector aperture, which would result in a significant error. This situation can be avoided by ensuring that the bandpass of the source is less than the free spectral range of the grating being tested. The free spectral range Fλ is defined as the range of wavelengths Δλ in a given spectral order m that are not overlapped by an adjacent order:
Fλ = Δλ = λ1/m (3)
For an echelle being measured in the m = 100th order at λ = 250 nm, the free spectral range is 2.5 nm. The detector aperture must also be sufficiently narrow to prevent adjacent orders from being detected, but not so narrow as to violate the "rule" regarding the bandpass of the light source and grating under test.
Degradation of the Reference Mirror
When a mirror is used to determine the incident light energy, its reflection as a function of wavelength needs to be well characterized. Mirrors tend to degrade over time due to atmospheric exposure, and if not re-characterized periodically, optimistic measurements of grating efficiency will result. At the National Physical Laboratory (NPL) in England, an aluminum-coated silica flat was used as a reference mirror. This is nothing new, but in this case the "buried" surface of the mirror was used as the mirror surface instead of the metal surface itself. Since the aluminum is never exposed to the atmosphere, its reflection is stable, and since the mirror was characterized through the silica substrate, its influence is automatically accounted for.4 The restriction in using the "buried surface" method is that the incident beam must be normal to the mirror surface to avoid beam separation caused by multiple reflections from the front and buried surfaces. When an unprotected mirror surface is used as a reference, absolute measurements of its reflection should be made on a regular basis.
Collimation
If the incident beam is not reasonably well collimated, the rays will fall upon the grating at a variety of angles and will be diffracted at different angles. In the case of a diverging diffracted beam, the beam will spread, possibly overfilling the detector. Since the reference beam does not encounter a dispersing element in its path (but the sample beam does), it is possible that all of the energy will be collected during the reference measurement but not during the sample measurement, causing the measured efficiency to be low.
Whenever a monochromator-based light source is used it is difficult, if not impossible, to perfectly collimate the beam emerging from the exit slit in both planes. It is important to collimate the beam in the direction perpendicular to the grooves, but it is not as critical for the beam to be well collimated in the direction parallel to the grooves, since no diffraction occurs in that direction. A limiting aperture may be used to restrict the beam size and prevent overfilling the grating under test.
It should be emphasized that beam collimation is not nearly as important in an efficiency measuring system as it is in an imaging system, such as a spectrograph. It is only necessary to ensure that the detector collects all of the diffracted light. The degree of collimation required largely depends on the dispersion of the grating under test, but in most cases a beam collimated to within 0.1o is adequate. For example, an angular spread of 0.1o in a beam incident upon a 1200 G/mm grating measured in the 1st order at 632.8 nm (Littrow configuration) will produce a corresponding spread in the diffracted beam of less than 1 mm over a distance of 500 mm.
Stray light or "Optical Noise"
The influence of stray radiation must always be taken into consideration when making efficiency measurements. If the level of background radiation is very high, the detector may be biased enough to result in a significant error. This is especially true when simple DC detection methods are used. Any bias introduced by background radiation must be subtracted from both the reference and sample measurements before the ratio is computed. For example, if the background radiation equals 2% of the reference beam, and the grating being tested measures 50% relative efficiency, the actual efficiency is 48/98 or 49%. This represents an error of 1% of the full-scale measured efficiency. In many cases simply operating the instrument in a dark lab or enclosure is sufficient to reduce background light to insignificant levels. Averaging is often used to "smooth out" noisy signals, but unlike other more random noise sources that tend to be bipolar, stray light-induced noise is always positive. Averaging several measurements containing a significant level of optical noise may bias the final measurement. In most cases, it is best to use phase-sensitive detection to remove the effects of unwanted radiation.
Polarization
Most efficiency curves display the S and P as well as the 45-degree polarization efficiency vs. wavelength. When making polarized efficiency measurements using an unpolarized source, it is necessary to use some form of optical element to separate the two polarization vectors. It is critical that the polarizer be aligned as closely as possible to be parallel (P plane) or perpendicular (S plane) to the grooves or a polarization mixing error will result. To determine the 45-degree polarization efficiency of a grating, it seems easy enough to set the polarizer to 45 degrees and make the measurement, but unless the output from the light source is exactly balanced in both S and P planes, an error will result. Figure 3 shows the effect of source polarization on the measured efficiency of a hypothetical grating having efficiencies of 90% in the P plane and 50% in the S plane at some arbitrary wavelength. In one case the light source contains equal S and P intensities while the other has a 70:30 S to P ratio. In the case of the balanced light source, as the polarizer is rotated to 45o, the efficiency is 70%, exactly the average of the S and P measurements. On the other hand, the unbalanced source results in a measured efficiency of 60%. This represents an error of 10% of the full-scale measured value. For that reason it is always recommended to make separate S and P measurements and then average them to determine the grating's 45-degree polarization efficiency.
Unequal Path Length
An error can result in a single detector system purely as the result of the optical path being different between the reference and sample measurements. This is especially true at UV wavelengths where the atmospheric absorption is significant. Different optical path lengths are not as much of a problem in dual detector systems since the relative calibration of the two detectors can compensate for atmospheric effects.
Mechanical Sources of Error
Alignment of incident beam to grating rotation axis
It is critical to align the incident beam to the rotation axis of the grating stage and mount. If not, the beam will "walk" across the grating surface at relatively low incident angles, and partially miss the grating surface at very high incident angles. Since the incident and diffracted beams are displaced from their correct location, it is entirely possible that all or part of the diffracted beam will miss the detector aperture.
Alignment of grating surface to grating rotation axis
The effect of not having the grating surface located exactly over the rotation axis will be similar to that of not having the beam aligned to the grating rotation axis. Optimally, a grating mount that references the grating's front surface, rather than the sides or back of the grating substrate, may be used to ensure alignment. This is often not practical since the contact points on the mount may leave an impression on the grating surface. To avoid this problem, an inclined lip or rail is sometimes used that makes contact with the grating on the extreme outer edge only. On beveled grating substrates this can be a source of error since the dimensional variation of the bevels can be significant. If the grating mount does not reference the front surface, an adjustment must be provided in order to accommodate gratings of various thicknesses.
Orientation of the grating grooves (tilt adjustment)
On grating mounts that use the substrate to locate the grating to be tested, the plane in which the diffracted orders lie will be tilted if the grooves are not properly aligned with the sides of the grating substrate. This may cause the diffracted beam to pass above or below the detector aperture. Most gratings do not have perfect alignment of the grooves to the substrate, so it is necessary to incorporate a method for rotating the grating a small amount in order to compensate for groove misalignment.
Orientation of the grating surface (tip adjustment)
Due to some wedge in the grating substrate, for example, the grating surface may not be parallel to the grating rotation axis. This will cause the diffracted beam to fall above or below the detector aperture. On most grating mounts an adjustment is provided to correct this situation. Ideally the grating tip, tilt, and rotation axes all intersect at a common point on the grating surface, but in fact it is extremely rare to find a grating mount in which the tip axis does so. In most cases the tip axis is located behind or below the grating substrate, so when adjusted, the grating surface will no longer lie on the rotation axis. The ideal situation is one in which the grating is front-surface referenced on the mount so that no adjustment is needed.
Grating movement
It is essential that the grating being tested be held securely in the mount during the testing process. Vibration from motors and stages as well as the inertia generated by the grating as it is rotated may cause it to slip. Any motion of the grating relative to the mount will result in alignment errors and invalidate any measurements taken after the movement occurred.
Electrical Sources of Error
Detector Linearity
In principle, all that is required to make satisfactory ratiometric measurements is a linear response from the sensing element and associated electronics. Nearly all detectors have response curves that exhibit non-linearity near saturation and cut off. It is extremely important to ensure that the detector is biased such that it is operating within the linear region of its response curve. In addition, the detector preamplifier and signal processing electronics must also have a linear response, or at least have the non-linearity well characterized in order for a correction to be applied. Neutral density filters may be inserted into the optical path to verify or characterize the detection system linearity. The following set of five calibrated neutral density filters is sufficient, in most cases, for verifying the detector response to within ± 1%:
| Optical Density | Transmission (rounded to nearest whole percent) |
|---|---|
| 0.1 | 79% |
| 0.3 | 50% |
| 0.6 | 25% |
| 1.0 | 10% |
| 2.0 | 1% |
Detector non-linearity becomes a major source of error when the reference and grating signals differ significantly in intensity. Unless the linearity of the detector and associated electronics has been well established, using a mirror with a reflection of 90% or higher as a reference may introduce an error if the grating being measured has an efficiency of 20%. This is analogous to sighting in a rifle at 100 yards and using it to shoot at targets 25 yards away. In some situations it is best to use a well-characterized grating as nearly identical to the grating to be tested as possible. This method is especially useful for making "go/no-go" efficiency measurements. If the reference grating is carefully chosen to be one that is marginally acceptable, then the efficiency measuring instrument will have its greatest accuracy at the most critical point. All gratings measuring greater than or equal to 100% relative to the reference grating are assumed to be good and those below 100% are rejected. Of course this method requires periodic recharacterization of the reference grating in order to maintain measurement integrity.
Changes in Detector Sensitivity
Some efficiency measuring instruments use separate detectors for making the reference and grating measurements (these are not to be confused with systems that use secondary detectors to monitor light source fluctuations). Most, however, use a single detector for both the reference and grating measurements instead. There are very good reasons for doing this. First of all, detectors and the associated electronics are expensive, so using a single detector is far more cost effective. Detector response characteristics change over time, so frequent calibration is necessary in a dual-detector system to ensure that the photometric accuracy of each detector has not changed relative to the other. By using the same detector for sample and reference measurements, photometric accuracy is not an issue, since an error in the reference measurement will also be present in the grating measurement and consequently nullified.
Sensitivity variation across detector surface
A significant error can result if the reference or diffracted beam is focused down to form a spot that is much smaller than the detector's active area. Some detectors, especially photomultipliers, may exhibit a sensitivity variation amounting to several percent as the spot moves across the detector surface. It is often sufficient to place the detector aperture far enough away from the detector such that the spot is defocused and just under-fills the active area. Alternately a diffuser or integrating sphere is sometimes used to distribute the light more uniformly across the detector surface.
Electronic Noise
Any form of optical or electronic noise can influence efficiency measurements. It is desirable to maintain the highest signal-to-noise ratio (SNR) possible, but often a trade-off must be made between signal strength and spectral resolution. Decreasing the monochromator slit width in order to narrow the bandpass of the source results in a reduced detector output signal. Care must be taken not to limit the intensity to a point where electronic (and optical) noise becomes a significant factor. In most cases, an SNR value of 200:1 is adequate.
Environmental Factors
Temperature
Normally it is not necessary to perform efficiency measurements in an extremely well regulated environment, but there are a few cases in which temperature control is needed. Whenever very high spectral resolution measurements are made, (1 nm or less), temperature variation within the monochromator may cause a significant wavelength drift. Temperature fluctuations may cause optical mounts to expand or contract resulting in a displacement of the beam. It is always a good idea to keep heat sources well away from all optical and mechanical components that may affect the grating being tested or the beam. It is also wise to allow gratings that are to be tested to acclimate in the same environment as the test instrument.
Humidity
Humidity is not usually a significant error source, but since it can affect the system optics and electronics, it merits mentioning. A high humidity level may influence measurements at wavelengths where atmospheric absorption varies with relative humidity. Low humidity promotes the generation of static electricity that may threaten sensitive electronic components. In general, the humidity level should be maintained in a range suitable for optical testing.
Vibration
Vibration becomes an error source when its amplitude is sufficient to cause the grating under test or any of the optical components to become displaced. If the vibration is from a source other than the instrument itself, then mounting the instrument on a vibration isolated optical bench will solve the problem. If the instrument itself is the vibration source, then the problem becomes a little more difficult. Stepper-motors are most often used to rotate and translate the grating being tested, as well as tune the monochromator, select filters, etc. As the motors ramp up to predetermined velocity, a resonant frequency is often encountered that will set up an oscillation with one or more mechanical components in the system. While it is sometimes necessary to pass through these resonant frequencies, it is never advisable to operate continuously at those frequencies. Most motion controllers have provisions for tuning the motion profile to minimize resonance. Some motion controllers allow micro-stepped operation of the motors, producing a much smoother motion. Although generally more expensive, servo controllers, amplifiers, and motors provide exceptional accuracy and very smooth motion.
Summary
Many of the error sources identified can be eliminated entirely, but only at the expense of decreased functionality. Greater accuracy can be obtained using an instrument that operates at a fixed wavelength in a fixed geometry and is only used to test gratings that have identical physical properties. When a large variety of gratings are to be tested, each with a different size, shape, groove frequency, wavelength range, test geometry, etc., it is not practical to construct a dedicated instrument for each. In this case a more complex instrument is called for. In specifying such an instrument, each source of error should be identified, and if possible, quantified. An error budget can then be generated that will determine if the instrument is able to perform at the desired level. Most likely it will not, and then a decision needs to be made regarding which features can be compromised, eliminated, or implemented on another instrument.
Disagreements often arise between measurements made of the same grating on different efficiency measuring instruments. Slight differences in test geometry, bandpass, and beam size can have a surprisingly large effect on efficiency measurements. What is sometimes difficult to understand is that it is possible for two instruments to measure the same grating and get different results that are valid!
Grating efficiency is largely determined by the groove properties of the master from which the grating was replicated, and to some degree the coating. It is very rare for a master, regardless of the process used to create it, to have perfectly uniform efficiency at every spot along its surface. In some cases the efficiency may vary by several percent. If a grating is measured using a small diameter beam, then these efficiency variations are very noticeable compared to measurements made using a larger beam. If two different instruments are used to measure the same grating, it is possible that the beams are not exactly the same size or, in the case of a small beam diameter, are not sampling exactly the same spot on the grating surface. Both instruments are correct in their measurements, but still do not agree. For this reason, whenever comparisons between instruments are made, the differences in their configuration must be taken into consideration.
The goal of efficiency measurement is to characterize the grating under test, not the apparatus making the measurements. For this reason, efficiency curves should report not only the relative or absolute efficiency vs. wavelength, but the properties of the instrument making the measurement as well. Only then is it possible to reproduce the results obtained with any degree of accuracy.